HomeTutorialsThe ShopMy Home

Wednesday, December 7, 2011

Inspired Cube Console Table


Hello Everyone!
We have a long, narrow mudroom/breezeway that connects our house to our garage and we realized it was built years later after our home & garage were originally built in 1951. It is great for storing our shoes, coats and winter gear but it is almost too big! I love it but I wish I could subtract some of the square footage and add it to our home!

Any who, since we been neglecting this room a little bit with updates (ahem the GORGEOUS red outdoor carpet that is tacked down with super glue I swear), I have been trying to make it a little cuter with decorating it since this is usually the first room our friends and family see when they enter our home (instead of using the front door which goes enters directly into our living room). I wanted a long cubby console type piece but I didn't want to spend too much $$$. I had a bought one of these guys about two years ago and it couldn't figure out what to do with it so it just sat there in our mud room/breezeway.
ClosetMaid Cubeicals® 9 Cube Organizer Espresso.Opens in a new window
Source: Target

I know Pottery Barn sells a similar cube bookcase but for $419......seriously?! I love Pottery Barn & most everything they do but hello these two are soooo similar! Yes, Pottery Barn's is solid wood but even if I built my own I would cost me way less than $419!!
Bedford 3 x 3 Bookcase
Source: www.potterybarn.com
So another year passed of our boring little cube bookcase and I finally had an idea! I bought another cube bookcase but instead I bought the 6 cube version. The bookcases were both black but that was fine since I was going to paint it to give it a little personality! Here is how it looks today:
I bought a board at Lowe's for the base, along with four bun feet to raise it up off the ground. I also attached to boards to the top which I stained a dark walnut. I then attached some MDF beadboard to the back and painted the whole thing Natural Canvas by Benjamin Moore. As my husband knows I can't leave anything pretty and perfectly painted so I went crazy sanding and lightly stain the whole thing to give it character :).

I loveee changing the decor on it for the different holidays too! Here it is in the past Fall/Halloween season:


I also made the shelves above the cubby bookcase and you can see in the picture above I hadn't gotten to painting the smaller bookcase's corbels.

The dog food bin I made from using an old Christmas popcorn tin and spray painted white. I then applied the "Dog Food" decals.

Here is a few more pictures of our breezeway/mud room:
We are hoping one day to get rid the lovely red outdoor carpeting and replace it with this:

Cork flooring! Some day!
Eventually I will blog about my building of the bench in the breezeway/mudroom!
Thanks for stopping by!
Jessica

Tuesday, December 6, 2011

Dining Table Switcharoo

Hello Everyone!
When we moved into our home we had inherited my parents round oak pedestal table which I thought WOULD not work for the envision I had for our dining area in our kitchen. Well after buying a "bar height" square table and three years later the original table that my parents had given us was back! My husband told me a few days ago he likes the idea of using the old round table because he never like the bar height table because he didn't like being elevated off the ground while eating?.....yeah I don't get it either. Anyway the cute round table is back and being the crazy person I am I decided that it must come out of the basement last night at around 8 pm at once and since my husband wasn't going to be home until 9:30 pm I was going to do it myself (note to readers, please wait to get help it was heavy!)

So I figured out how to take it apart and piece by piece I carried or lugged it up the stairs. Here it is in pieces.....just ignore the messy kitchen since I had shoved everything to one side and currently had to kitchen tables in the way.


So as I was taking apart our square table my husband came home to find me sitting on the floor with a drill and I think he isn't too surprised anymore when he comes home me in the middle of project :).


I was able to talk my husband in to helping me lift the top of the new/old table back on the pedestal and the switcharoo was done!

We have this long blank wall on the side of kitchen where we will finally put the french door in that will open to the deck (right now it is sitting in the corner of our kitchen)

So I have decided once I get the kitchen back to normal I will tear it apart again by installing some board & batten treatment along that wall and I CANNOT wait!!! Here is what I hope for it to look like:
I got a lovely surprise today from my younger sister! She was in Des Moines a month ago or so at a antique store and bought these fishing/boating tea towels for me! I LOVE THEM! Everyone knows my husband is obsessed with fishing and I am not talkign about laid back, enjoy the afternoon/weather fishing. He is very competivite about it but I am happy that he has a great hobbby that keeps busy on a Saturday so I can get some DIY projects done around the house. Anywho it's not that I don't mind fishing or the outdoors but I don't care for the stuffed fish/animals lodging decor that comes with it so I try to deocorate our home with things we boht like! Here are the towels and I haven't decided what I am goingn to do with them yet since I will not be using them as a towel.
Thanks again Lil' Seester for the awesome gift! :)

Thanks for stopping by!
Jessica

Sunday, December 4, 2011

Inspired by Pottery Barn!

Hello Everyone!
As promised here is one project I worked on this weekend with many more to follow! I was recently looking through the LARGE stack of Pottery Barn catalogs that I keep and look to get inspired from. Here is a picture of the Silver Bell Swag that I thought was so purr-tee!
It is no longer available but that didn't matter to me since it was $69 and I wouldn't be purchasing it for that price! So I brainstormed some ideas and here is what I came up with:

Oh my gawsh isn't this the most beautiful Christmas decor you have ever seen? I was thinking about leaving it the way it is........NOT! So I went looking for medium-to-smallish plastic bells and I stopped at Dollar General just to see if they had what I was looking for and BINGO! A whopping three dollars spent and I can use the two plastic bells and do something with the three small jingle bells.


I dismantled the bells and started painting using a matte gray color to try and imitate the mercury color of the Pottery Barn version.


I then realized I hated it and tried taking the acrylic paint off the bell using nail polish remover which actually gave me the effect I wanted since it took the gold layer off the bell too!

I gathered some twigs that I had used in a vase that I was no longer using and thought they would do for my "swag". I held the twigs together with some covered floral wire I had lying around.
I then attached a few faux evergreen branches that I thought might work for this project.
I attached the bells with some more floral wire.
Then added the burlap bow to the top and realized my two pups love the burlap fabric...
Then I glued some small jingle bells to the branches.
I hung it up on our door from our mudroom/breezeway to our kitchen and while it isn't exact to the Pottery Barn one it only cost me $3 dollars since I had all the other supplies exact for the Dollar General Bells.

Here is a couple pictures of what our tree looks like so far! It takes me forever to get it the way I like it because I am constantly think of something else to add!

Have a great Sunday!
Jessica

Saturday, December 3, 2011

What Inspires You?


Hello Everyone!
I am busy working on craft projects around my house but I thought I would take a quick second to ask "What inspires you?". Whether it be a person, a place or do you inspire yourself?

When I have an idea or project in my head that I would like do but I don't know where to get started I look for inspiration from Google.....yes Google. For example recently I have thought about painting our trim throughout our home an off white (Dutch Boy Paint Natural Canvas to be exact) and I simply type this into Google Images and take a look at the pictures that would help me with this project. Or when I am thinking about installing board and batten in our hallway I look at pictures that help get me started. For example here are a few that have inspired for both of these projects!

I love the look of the crisp trim and bold colors but they have also included the look of natural wood in the ceiling, cabinets and mantle too.


And for the board and batten treatment in our hallway I have been truly inspired by this living room. The before and afters are amazing and I love how just a little bit of hard work can turn a room from okay to AMAZING!

BEFORE

AFTER

I am serially loving the difference of the after!

Well I better get back to work but thank you for stopping by!

Jessica

Friday, December 2, 2011

Easy Christmas Projects!

Hello Everyone!
I was browsing the Country Living website today and found some cute and easy Christmas projects!

Here are the links to some of the Christmas crafts I will be working on this weekend:
(I hope to show these to you by Sunday!)


Silver Bell Swag


I better get to work!

What is your favorite thing about the holidays?

Thursday, December 1, 2011

Inspired Mason Jar Snow Globes

Hello Everyone!

I love Anthropologie and I wish I could afford all the beautiful items they offer but I finally found something that I can make an almost exact replica and it would cost WAY less than what they sell it for! Here is what the cute mason snow globe jars look like:

www.anthropologie.com

Cute, right? But $39 for the largest jar when you can buy everything for around five dollars!? I have a few mason jars and white glitter around my house so I just needed the cute, little trees! I found these cuties at a store and they were 50% off too! So they totaled around two dollars and some odd cents.

Next I got my mason jars ready and glued the bottom of the trees to the underside of the lids. Filled the jar with my some purr-tee glitter, screwed the lid back on and flipped over the jar. Voila! (Please ignore my mess of a desk-too many projects with very little time!)


Here are the jars on the window sill in our kitchen. (Notice our stunning view of our Yellow Lab's kennel-no lake view property here!)


What I love about these jars is I can leave them out all winter!

Jessica

Wednesday, November 30, 2011

What I want for Christmas!

Hello Everyone!
I absolutely love this time of year and I love getting people gifts and in all honesty I could care less about receiving gifts but if for some reason I get any of these things I would be so happy! :)

Aren't these just the cutest! I love little knick-knacks that are unique and I think these would look lovely on a small side table or shelf.

www.pinkpigwestport.com

I have been eyeing this item for a while now and it reminds me of the old rug beaters but since Mr. Inspired loves fishing and I love antiques, it fits us perfectly. I would hang it sideways by itself or leaning against the wall on a shelf.
Fish Grill
www.potterybarn.com

Antique furniture - Especially this beautiful blue cabinet!
DSC_1956
Source

I love these vintage style signage display frames!
Vintage Industrial Signage Frames

Are you someone who gets their Christmas shopping done way before December or are you someone who is at the mall on Christmas Eve? Either way the best thing about the holidays is being with the people you love!

Jessica

Tuesday, November 29, 2011

Master Bedroom


Hello! So I have been contemplating whether or not to take one wall in our master bedroom and place wood planks on it. I know it has been popular lately and I loveeeee the look of this. Here are some examples:


I love The Lettered Cottage's whole house and they were lucky enough to already have planks behind their drywall!
wood plank wall

Love the color of these planks!

I think many will agree with me that it adds so much to a room and I don't think it would be too expensive to recreate as long as I used reclaimed or pine wood.

However Mr. Inspired might be a little uneasy of the thought of me putting umpteen million holes in the wall? My dream would be he would love it so much that it wouldn't matter! Hah!

So I did some more brainstorming and thought what about textured wallpaper? I am typically not a fan of it but I found a company in Holland that prints these beautiful wood plank wallpapers, but unfortunately they are $299.00 a roll........

So here is a picture of the wall I would love to slap up some wood planks on and yes, it is semi decorated for Christmas! Let me know what ya think!

Take Care!
Jessica

Monday, November 28, 2011

Let the sunshine in!!

Hello Dawlings!
So I loveee natural light and can't stand a dark home, which is why my bathroom situation has always bugged me! When we moved into our home over 2 years ago we made a quick decision for a window covering for our bathroom (which I might add is a work in progress!). I loathe cellular shades and I am sorry if I offended anyone who loves them. Cellular shades have no personality and are well they are just blah. Our bathroom has a window right near the commode and the view from this window is our neighbor's kitchen window. Now I do love our neighbor and he is a super nice guy but I don't think he wants to have the view of our bathroom when he is doing his dishes........or maybe he does-I kid, I kid! Anywho so we quickly made a decision to put up a cellular shade so that it filters the light but also gives us privacy. Fast forward two years later and I hate it.

Sorry for the terrible picture but I just didn't care because I couldn't look at this boring thing any longer!

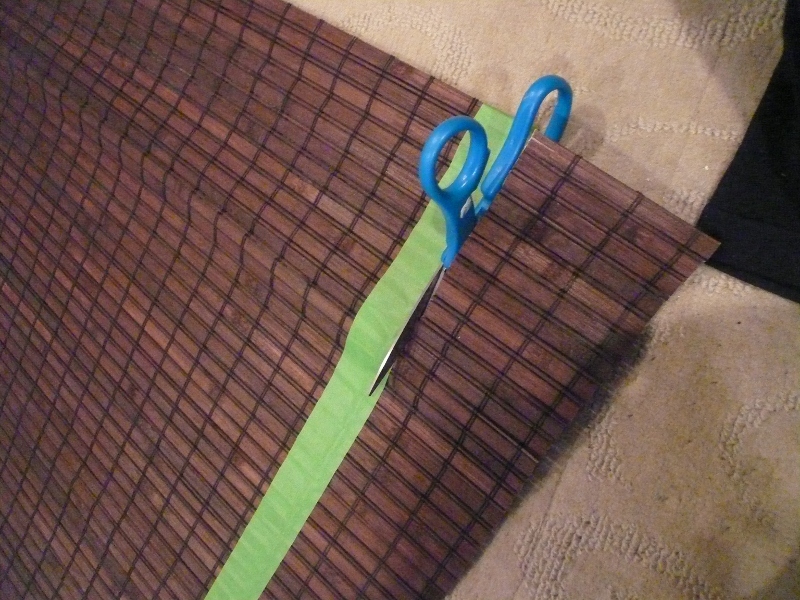
We have wood blinds and bamboo shades throughout our home which I love because they give some warmth so I took the bamboo shade off our window in the kitchen which we will be installing a door (another post for another day) and quickly realized it was too wide. So I came up with an idea of cutting it with my scissors and using paints tape as a guide. I first messed how much I wanted to take off each side.
$5.00 to anyone who notices my dog's dainty feet!

I then marked the shade with my painters tape and I cut away! It wasn't to terrible but just make to keep the strips of bamboo even.
Here ya go! I did make a liner for it out of brown fabric to allow for extra privacy! Sorry the picture is taken at night but I kept getting distracted by other projects!!


Have a great rest of the Monday!!
Jessica

Sunday, November 27, 2011

The most wonderful time of the year!

Hello!
My blog finally has a new look which I hope you approve! I am taking all my fall decor down and replacing it with my favorite decor-CHRISTMAS! I just love this time of the year because everything is so sparkly and pretty! I had seen this idea here last year and I thought would wait until this year since I already had the tree up and decorated by the time I saw this post. Our fake tree we bought a few years isn't the prettiest and I hate the bases of Christmas trees and I am not a huge fan of tree skirts. I had seen lots of trees in galvanized buckets and pretty baskets, and I knew what I had to do. 

First I look apart our tree stand which was a piece of cake and I took off all of the branches at the bottom.

I had bought a plastic bucket and a 50 lb bag of Quikrete, the smallest bag they offer. I pllaced my tree in the empty bucket and poured the dry mix in (which gets pretty dusty and it didn't help I had my two dogs trying to figure out what the heck I was doing!).


I then poured water into the mix like the directions said. I was worried my tree wouldn't stay put but it did so I didn't have to support it while the concrete hardened.

I let it cure overnight and they next morning it was solid. I put the tree in a plastic bucket so if I change my mind and want to put it in a basket I can!

I am finishing my tree today which I will post pictures soon!!


Tootles,
Jessica

Wednesday, November 9, 2011

Blog to look pretty soon!!!

Ello! I will have this blog looking really purttyy soon, I promise! I then hopefully will be updating almost daily!!

Toodles
Jessica

Friday, September 9, 2011

Been a longg time...

Hi Everyone!

So they say today is your birthday and it is! I need to start updating this blog pronto! I have so many projects that I would like to share and complete. Do you ever feel like you a never ending to-do list like me? I feel like every weekend I am going to get sooo much accomplished and well it doesn't work that way but I am slowly starting to realize that's the way life is. Which is hard for someone like me who is a planner, I love schedules, lists, etc. but getting them done is another thing. :)

Some days I wonder if there is anyone out there that at the end of a week they have finished all their chores, to-do lists and projects or is that impossible? If there is I applaud you because I feel like when I finish one project its on to the next! Even if I don't have one planned yet I put one together!

Any who I will get working on my blog this weekend....hopefully :) and I should/will have some stuff to show you lovely people next week!

Tootles
Jessica :)