HomeTutorialsThe ShopMy Home

Thursday, December 20, 2012

Hello Everyone,

I hope you are all doing well today! It has been snowing and pretty windy all day. I thought I would share with you some projects I did for the ledge shelves we have in our living room. I had pinned this DIY Pottery Barn Santa Claus Canvas over a year ago and finally finished it a few weeks ago. It didn't turn out perfect but I really like it. I have included the link to the blog where I got the instructions.
 

I originally painted mine with a silver paint pen but it was too light, so I painted over it with some red acrylic paint. Here is my canvas:

I painted a wooden letter G I had and glued it to a piece of paper and placed it in a frame I already had. I bought the "Let it Snow" sign at Michael's for under $1 and I had some galvanized metal number tags that I placed in the frame on the lower shelf.

 Hope you have a wonderful day!

-Jessica


Monday, December 17, 2012

Hello Everyone!

I can't believe Christmas is only a week from tomorrow! Time has been flying by and I thought I would share some updates of our baby girl's nursery. Yes, we are having a baby girl and before we found out I already had painted the nursery a gray/blue color because I knew I wanted that color even if we had a boy or girl. Here are some updates and keep in remind I still need to touch up some painting, replace that rug, finish my chair slipcover and get our baby girl a mattress!

I will post updated pictures when I get more projects finished!

Thanks for stopping by!
Jessica

Saturday, September 22, 2012

Projects Around Our House

Hello Everyone!

I am absolutely LOVING this weather we are having as Fall is my favorite season! I love everything about Fall including the weather, pumpkins, desserts, Halloween, Thanksgiving and it is right before the wonderful holiday season!


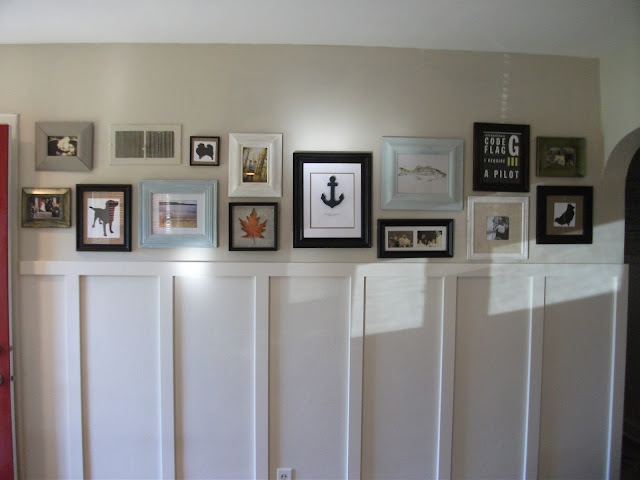
I thought I would show you a project I had worked on over the summer (early) and FINALLY show the results. I decided to do the board & batten treatment on one wall in our living room and wrap it around to the hallway. Of course I didn't use the board, just the batten part. I was originally going to do both but I don't mind it without the board. I used a collection of frames we have and put random things in them including pictures, paintings, our dog silhouettes and one shadow box which had faux butterflies in it but I recently replaced it with a big Fall leaf. Here it is:


Like I mentioned, I wrapped the batten around the corner and down the hallway.

I will start to show you the many projects I had worked on over the summer in the next week!

Have a great weekend and thanks for stopping by!

Jessica

Wednesday, September 5, 2012

Hello everyone!

I haven't been doing too many things around our house lately because I still get some morning sickness now and then, but it is getting better! We will hopefully find out if I will be decorating our nursery for a girl or boy in the next few weeks! :) Until then I have been interested in making some jewelry for myself since it doesn't require me climbing ladders or caulking/painting a lot!

I am sure most of you have seen this DIY Kate Spade necklace on Pinterest and other website but I had pinned it a while ago and finally got around to making one that was sort of similar. I won't bore you with a tutorial but I will give you the link to the one I used!

http://www.henryhappened.com/diy-kate-spade-bead-necklace.html

Here is the ogirinal necklace:


I love hot pink but I knew I wanted a red for the Fall and I used smaller beads that what was used in the tutorial. I got the wood beads from the kids craft section at Walmart. I picked out the medium shade wood beads and got the other supplies at Hobby Lobby. Here is how my necklace turned out:
Like I mentioned before, it's not an exact match but I am happy with how it turned out! I have saved a lot ideas for some neat necklaces in the future and I can't wait! 

Have a great day and thanks for stopping by!!!
 Jessica 

Wednesday, August 22, 2012

Hello Everyone!!!

It has been a long time since I wrote on my blog but I have been busy......being sick! Although my husband and I are VERY happy, I had terrible morning sickness for the last two months. We will be proud parents coming this February 2013! We couldn't be happier and cannot wait!

Of course I have been thinking of the possibilities for our nursery. We won't find out if we are having a boy or girl until the end of September but I know how I want to decorate the room whether we have a boy or girl. Here are some ideas I have for both:

Boy

My husband love, love, loves to fish and although I am not a huge fan of the cabin decor I still want to incorporate some fishing but add a nautical theme and use the colors navy, gray and yellow.


Nash's Nursery

Source


Source 

Girl

I do love pink but I think I will use it only as an accent if we have a girl. I will probably use pink, greige and mossy green. Here are some ideas:

Ellie's romantic vintage nursery
Source

alphabet wall art pink and beige nursery collage of framed letters over dresser
Source

Stay tuned to find out what we are having and the progress on the nursery!!

Thanks for stopping by!
Jessica


Sunday, June 10, 2012

Inspired Sisal Rope Mirror


Hello everyone!

I finished a project recently that I thought I would share with you. If you haven't already noticed I love anything nautical themed and the last few years any home decor involving rope has been pretty popular.  I love using twine or sisal rope to wrap an inexpensive vase or recently a lampshade. I have seen a lot of mirrors using a rope frame and I love them all but obviously they are a little expensive. Here a few I have seen and loved:


Bixby & Ball - $330


Pottery Barn - $395.....ouch!

My husband is an electrician and usually has many wood cable spools left over from projects and I have made sure that he gives them to me when he is done. Right now I just have three different sized wood spools because a lot of them are just plastic and I don't think I would use them. The large spool I am going to make an oversized clock, but I had a small one about 18" in diameter and I had some left over 1/4" sisal rope so I decided to make my own rope mirror.

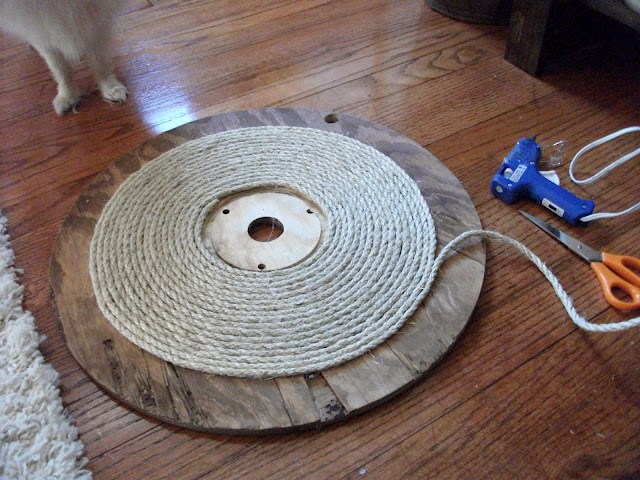
I had stained the wood spool top before but didn't like how it turned out so I used that side to start hot gluing my sisal rope around the center.

Notice our smallest dog's little feet at the top left, somehow he always makes a little appearance in my pictures!

I kept hot gluing the rope down around the previous row and even wrapped the sides in rope.
I had a beveled craft mirror that I had bought from Hobby Lobby a while ago for around two dollars and I decided it could work for the center of the rope spool top. I glued the mirror in the center using an all purpose craft glue, stacked a few books on top of the mirror and let it set overnight.

I attached some hanging hardware to the back and hung it up in our hallway. It may not be as large or perfect as the other mirrors but I am happy with it....plus it cost me $0! Even better!

Thanks for stopping by!
Jessica